Many companies and organizations that deal with IT have some form of Self-Service. Whether this be using something like ServiceNow, Microsoft Sharepoint, or something random like a Rube Goldberg Machine initiated by an e-mail. In either case, they have a system where users can go to a form, initiate a request and have a process ran. This functionality is a key requirement of process control theory. Today we're going to discuss how we can use GitLab to handle Self-Service.
Before we begin, This is not meant to replace ServiceNow or Sharepoint. It's to show an alternate using GitLab
For this article, you're going to need the following:
- A GitLab Instance that supports GitLab Pages.
- A GitLab Admin account, or Owner Access to (Two) GitLab Repositories.
- A WYSIWYG Editor, For this article we're using Adobe Dreamweaver.
- Some Knowledge of HTML
For the next Article in this series you'll need:
- Some Knowledge of Ansible
- A cloud provider account. Vultr, DigitalOcean, Amazon AWS, Etc.
The Forms
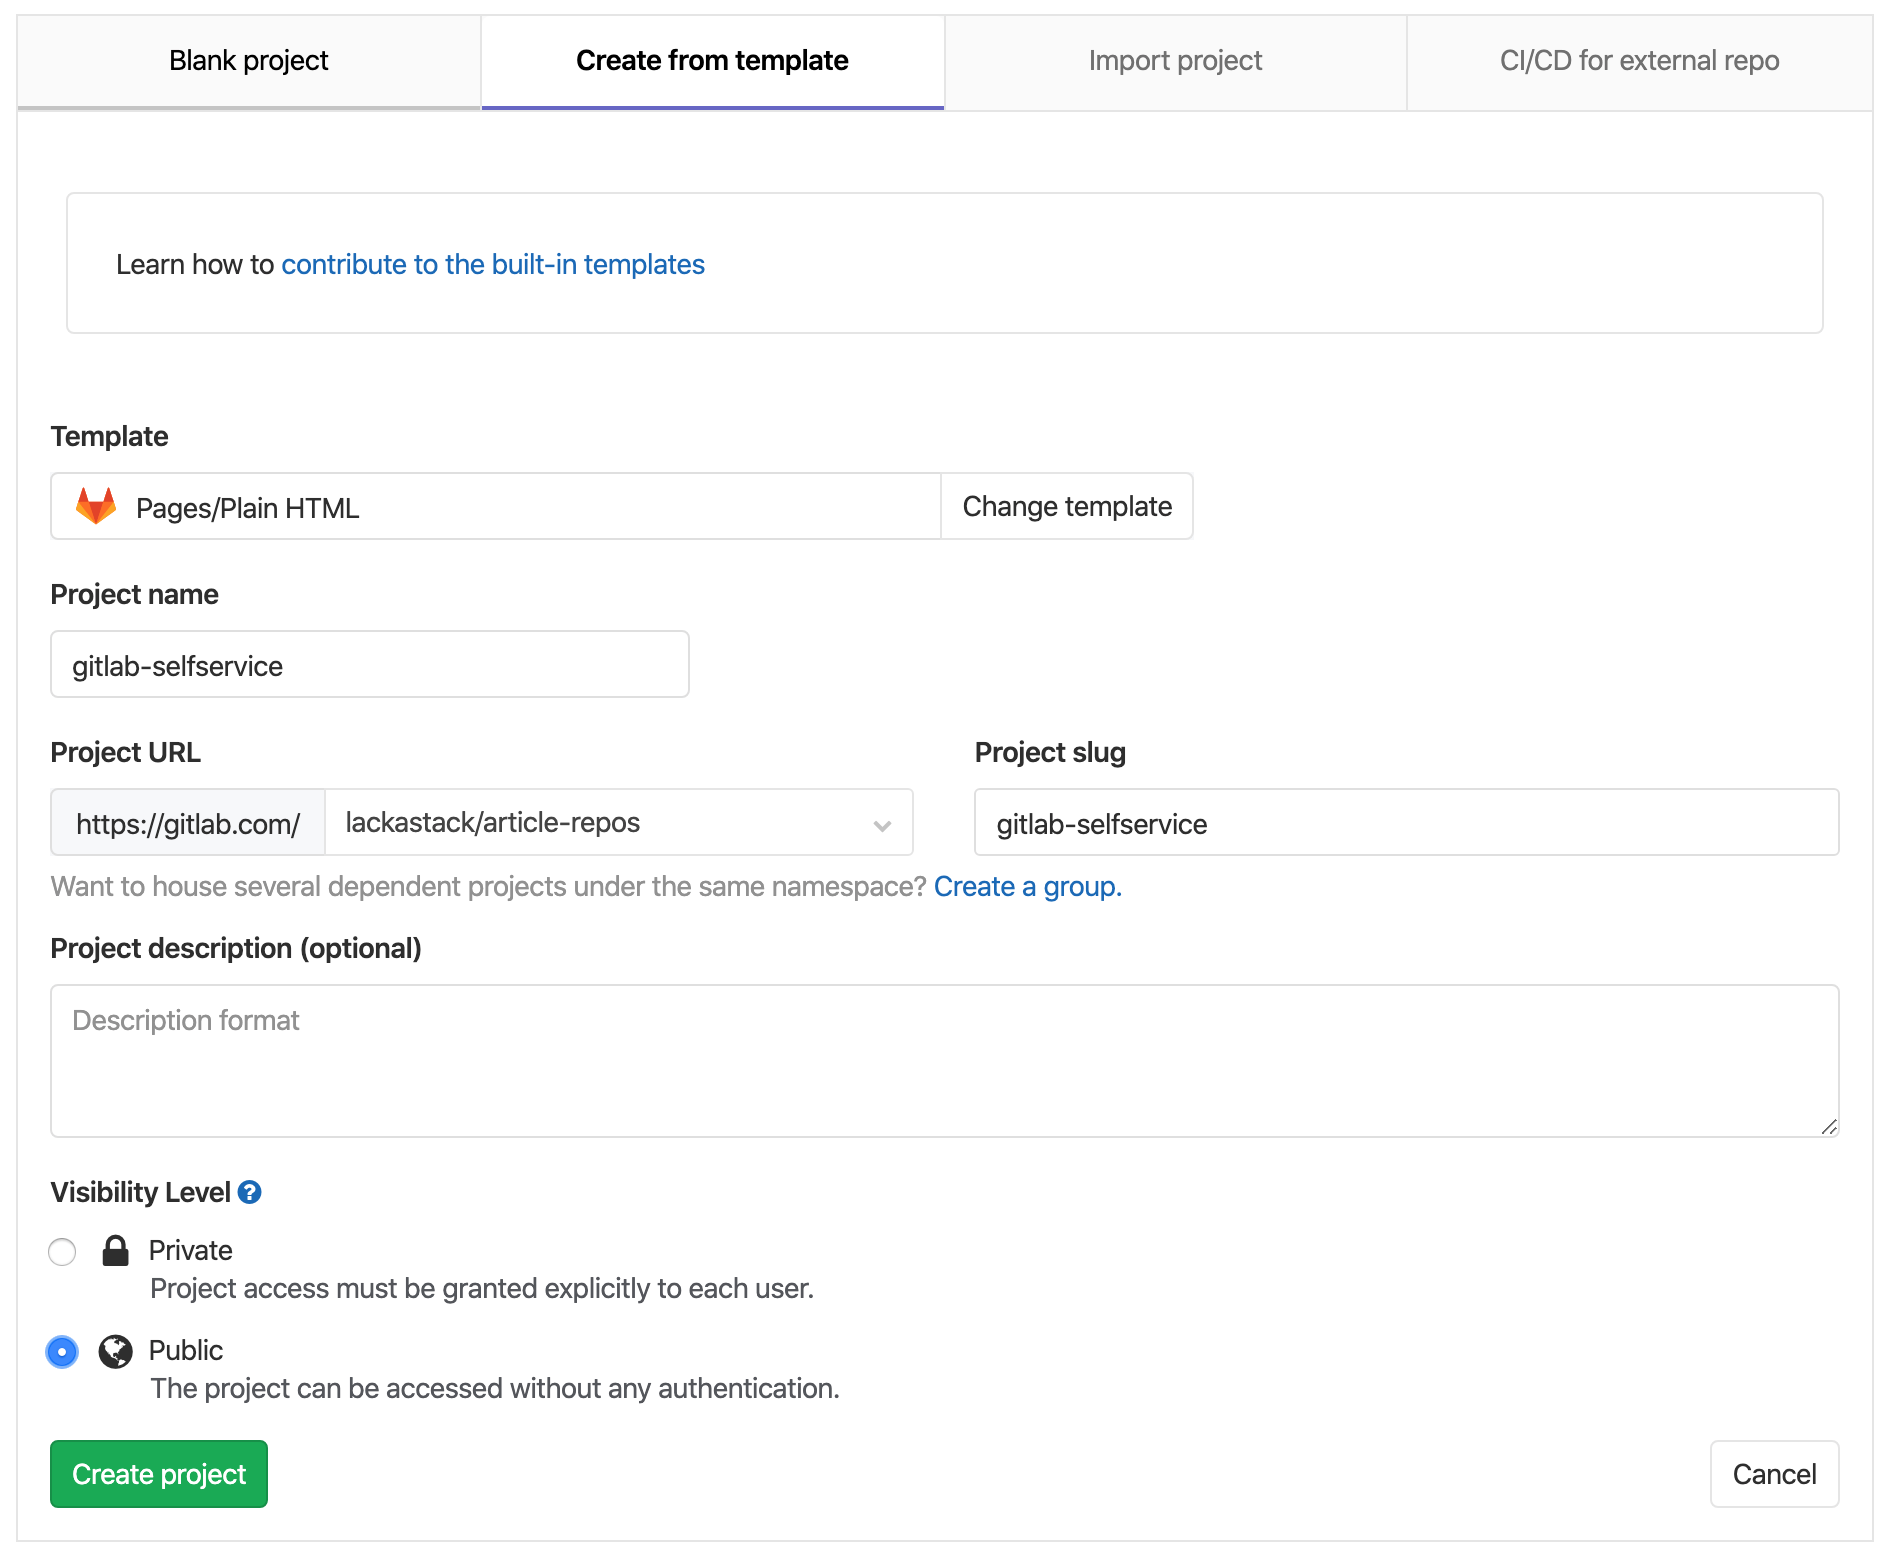
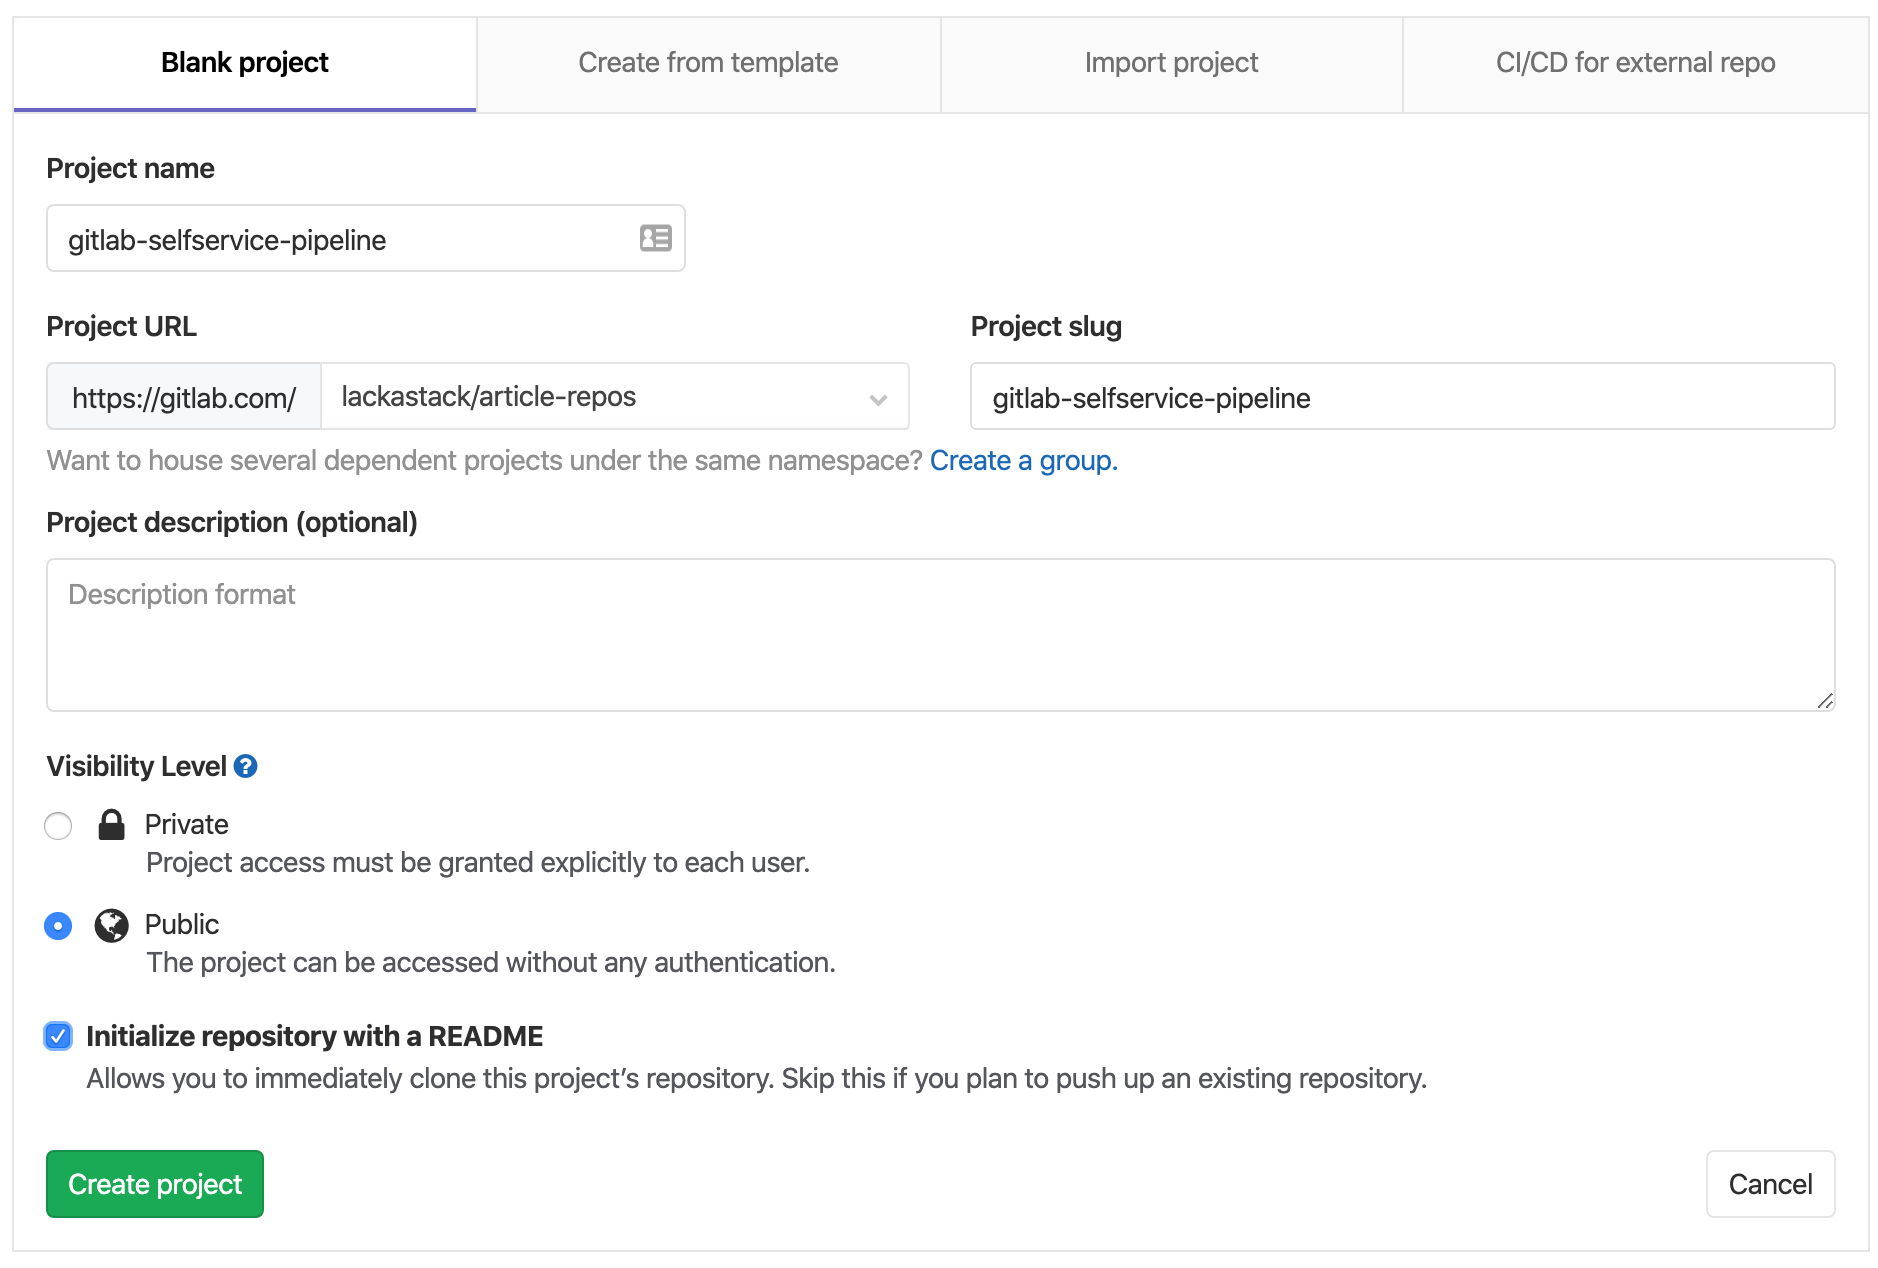
The most important part of this is the form. After-all, without it, the user can't make a request. For this we're going to use GitLab Pages to serve our self-service form. So, at this point, go ahead and login to GitLab and make a new repository. Call it something like "Self-Service Portal". This should be based off of the Pages/HTML Template. See the picture below for this.
Once this is done, you're given a repository with a public/index.html and public/style.css structure. Now we're going to need to pull down that repo and modify the index.html file.
git clone https://repourl/repoWith the files downloaded, we'll need to open that public/index.html file with your HTML WYSIWYG Editor. If you remember i'm using Dreamweaver. Once open you're going to need to do the following..
- Open the file in the WYSIWYG Editor.
- Delete all text in the body such as
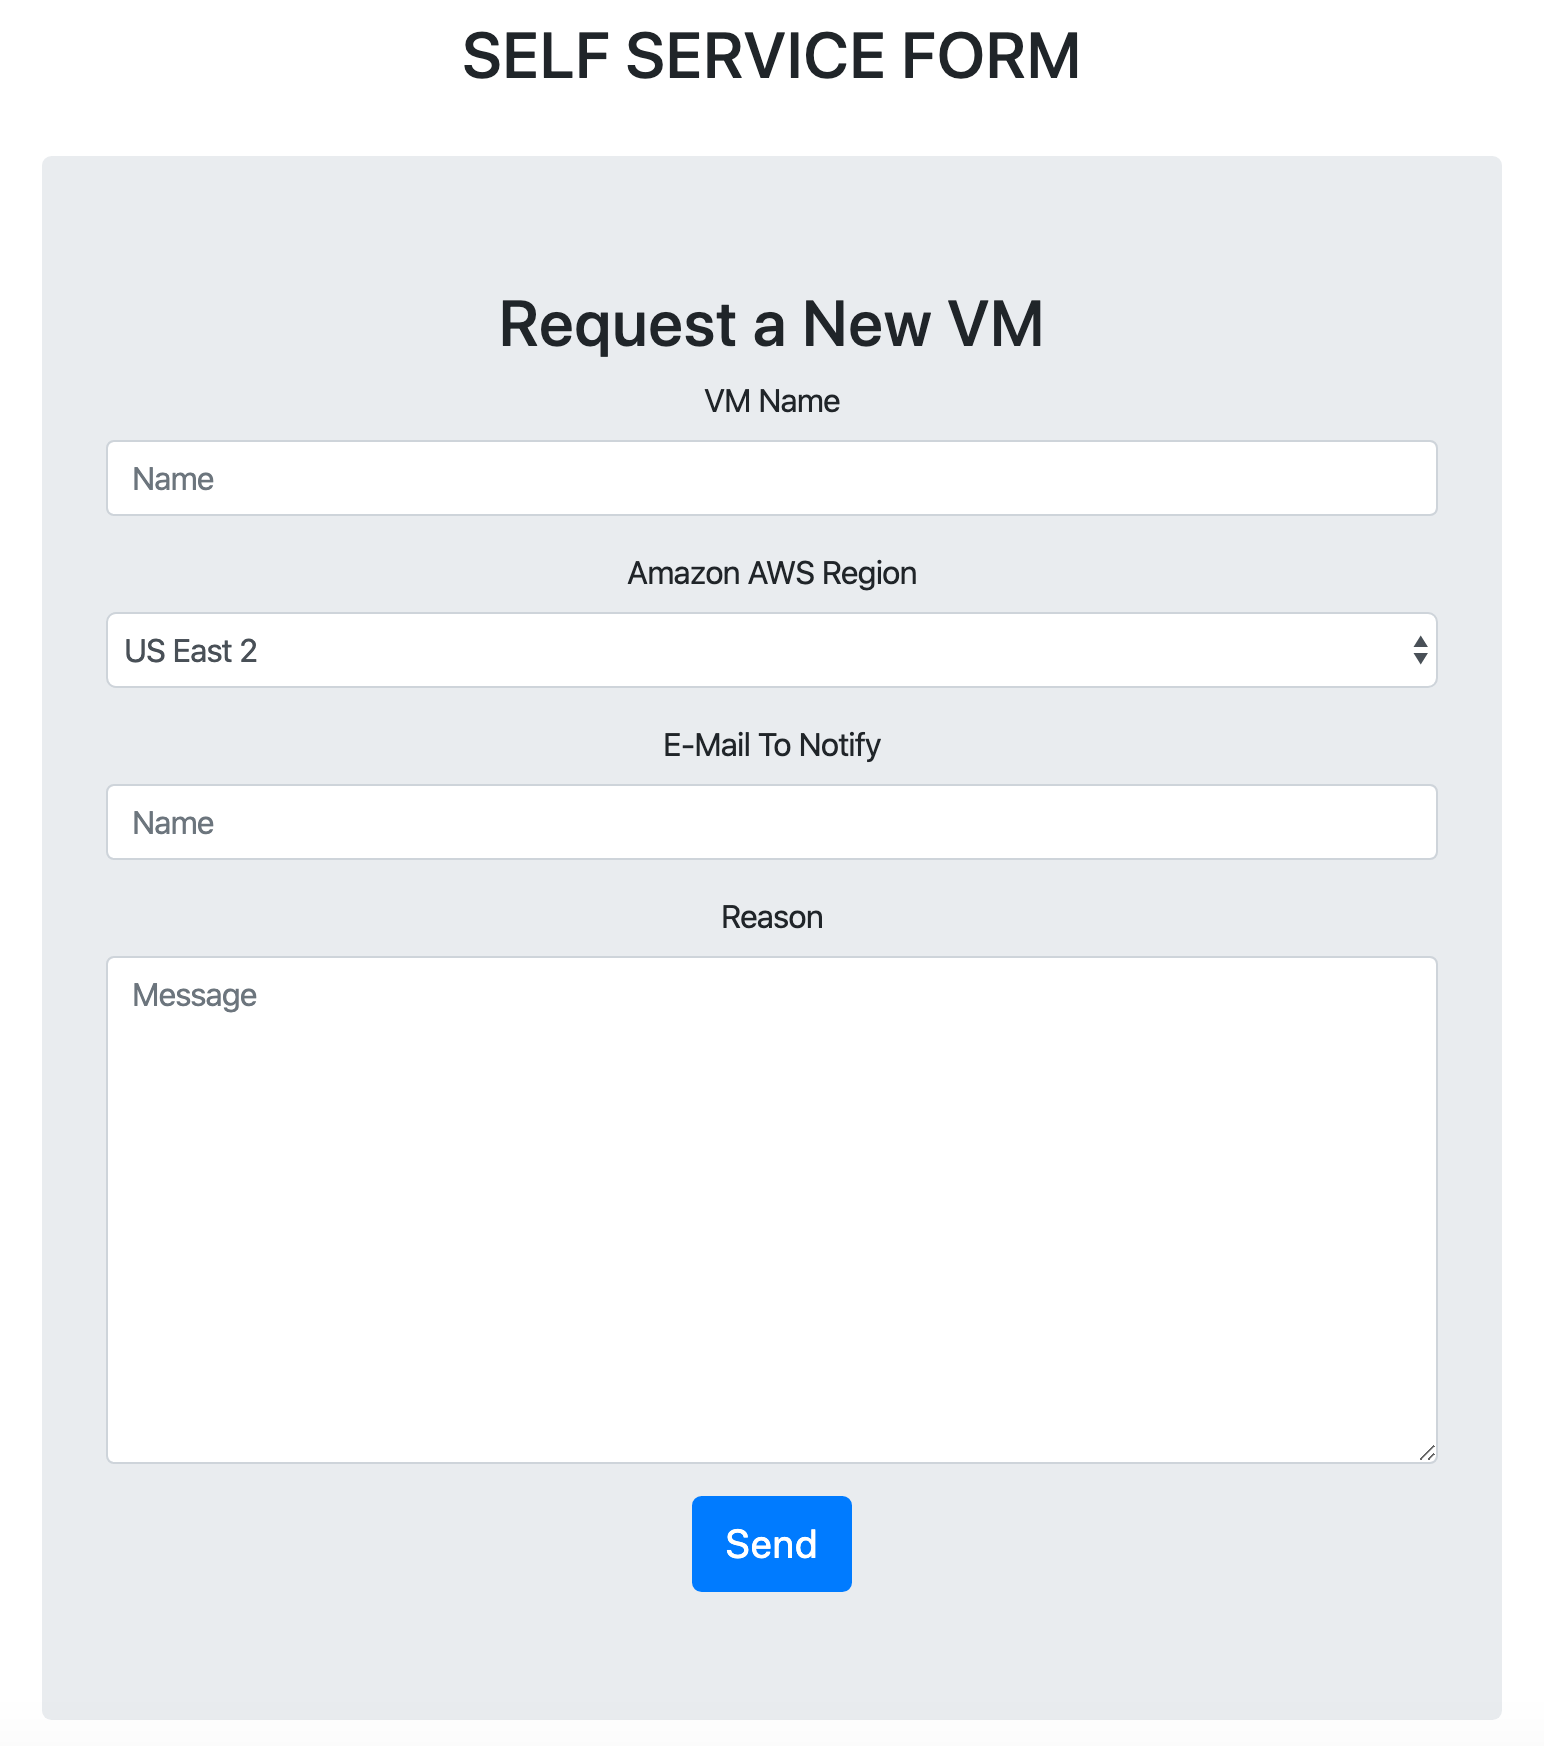
This is a simple plain-HTML website on GitLab Pages, without any fancy static site generator. - You're going to want to add a form to this page.
- Within that form, you're going to want to add fields and labels. One label and field for each value.
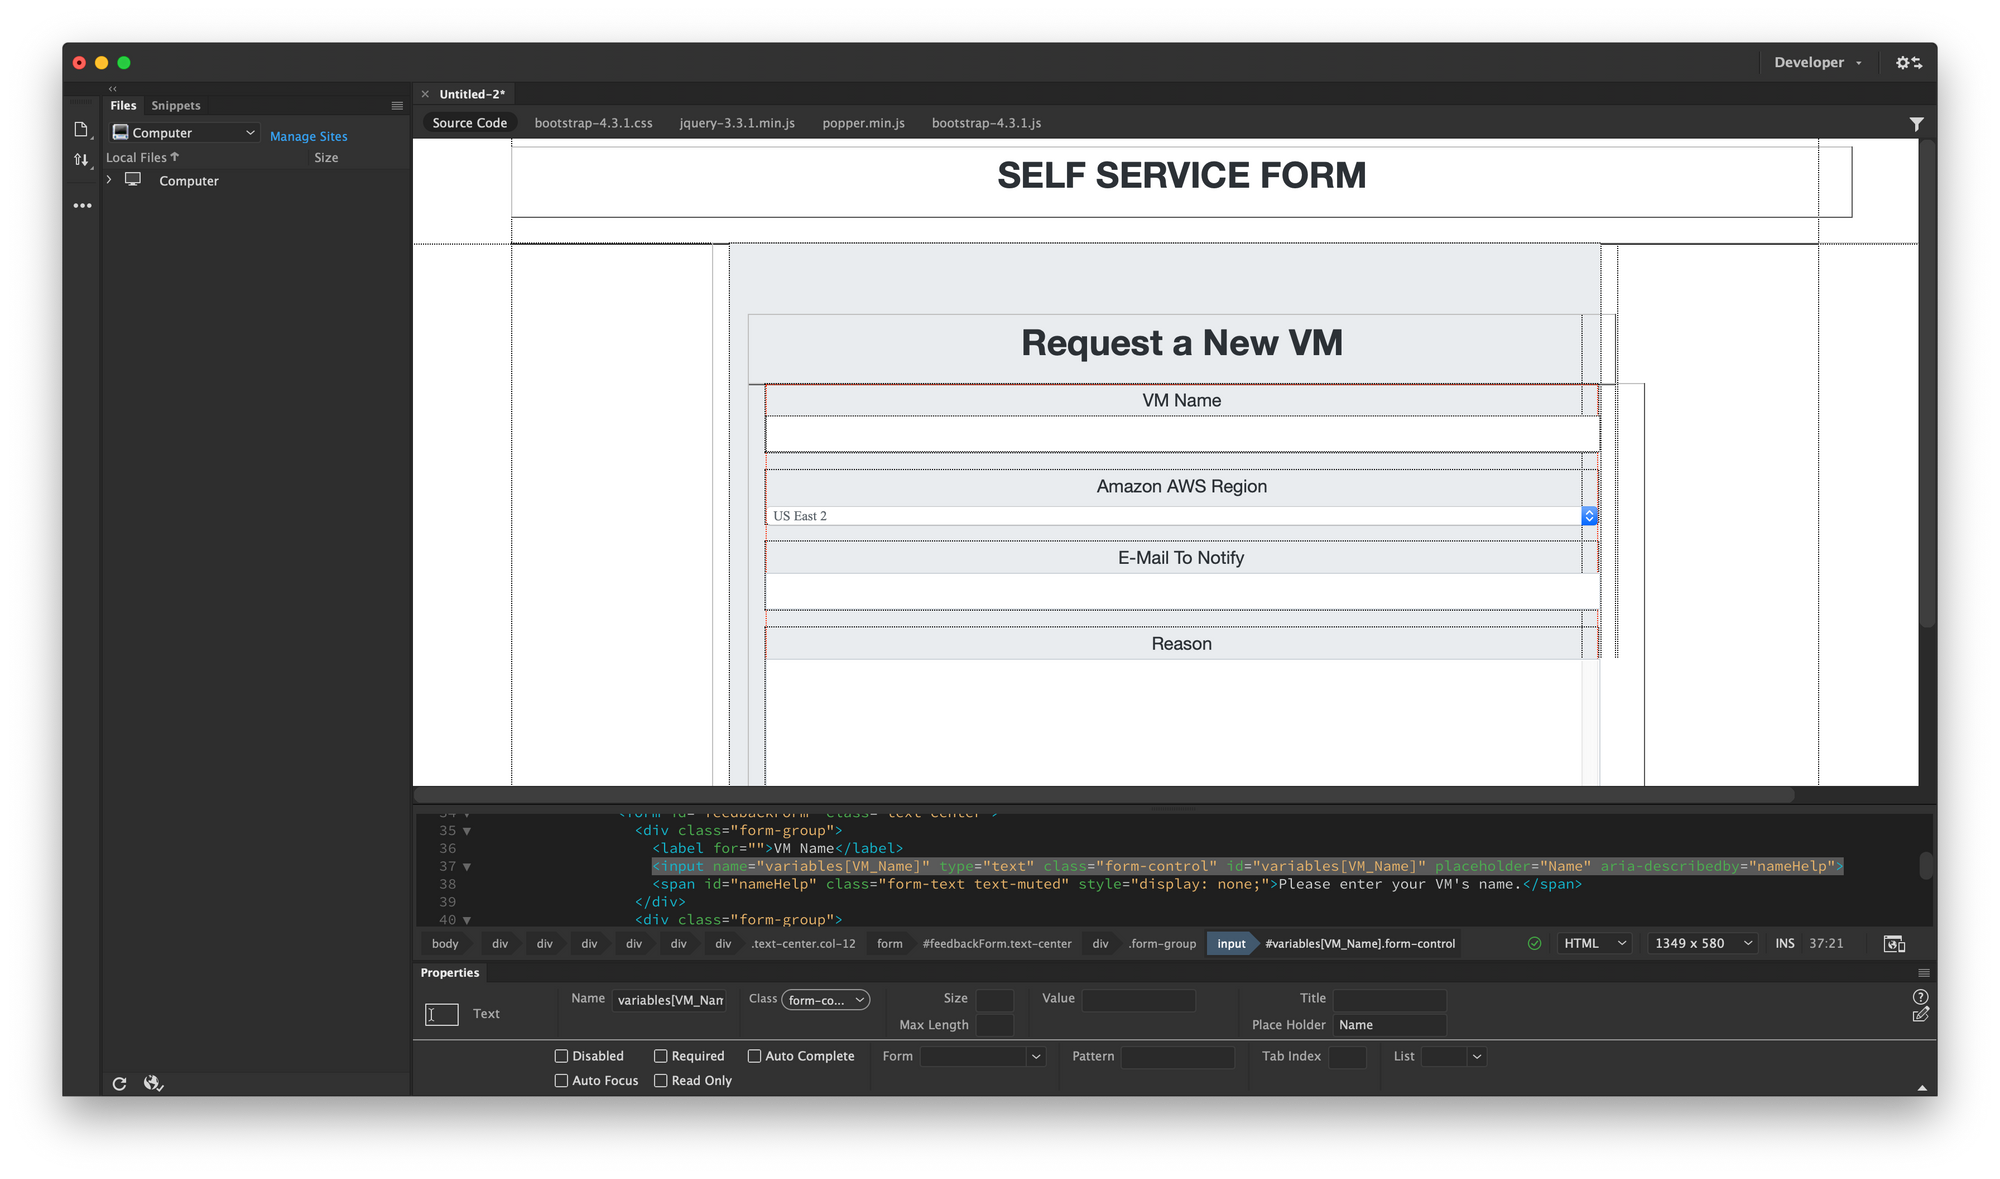
Below is a screenshot from my Dreamweaver editor showing what I've created so far. Don't worry about the details of things now, just try to get a form laid out.
The CI/CD Portion
Now that we have that setup, we're going to need to create another GitLab Repo. This repo is going to house all of our infrastructure code. The goal for this repo is to contain no secrets, no specific data, it's meant to be a complete dumb pipeline. It should only know what we pass from the form, This means all secrets, keys, data, etc should be from the form.
Below is an example of how it should be setup.
At this point, you have a completely blank repository. It should have a readme, and that's all.
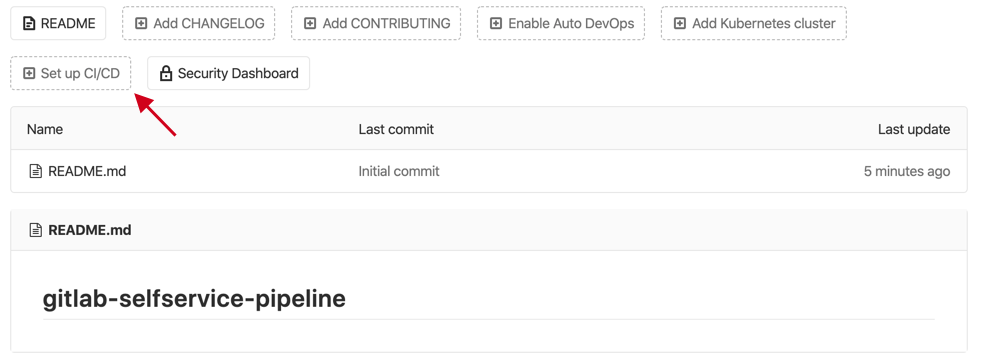
Do you see that button that says "Set Up CI/CD"? Go ahead and click that, this will take you to the GitLab Code Editor. We're going to walk through creating a GitLab CI File. You can read tons more docs on this here.
For starters, we're going to want to define the stages our jobs will run in. For this example, we're going to have only two. The first is a sanity check, the second is the infrastructure portion. The top of your CI File should look like this..
stages:
    - check-vars
    - do-infrastructure
Pretty descriptive right? Next we're going to define the first stage, the one that checks the variables. For this article, it's just echoing them.
check-variables:
stage: check-vars
script:
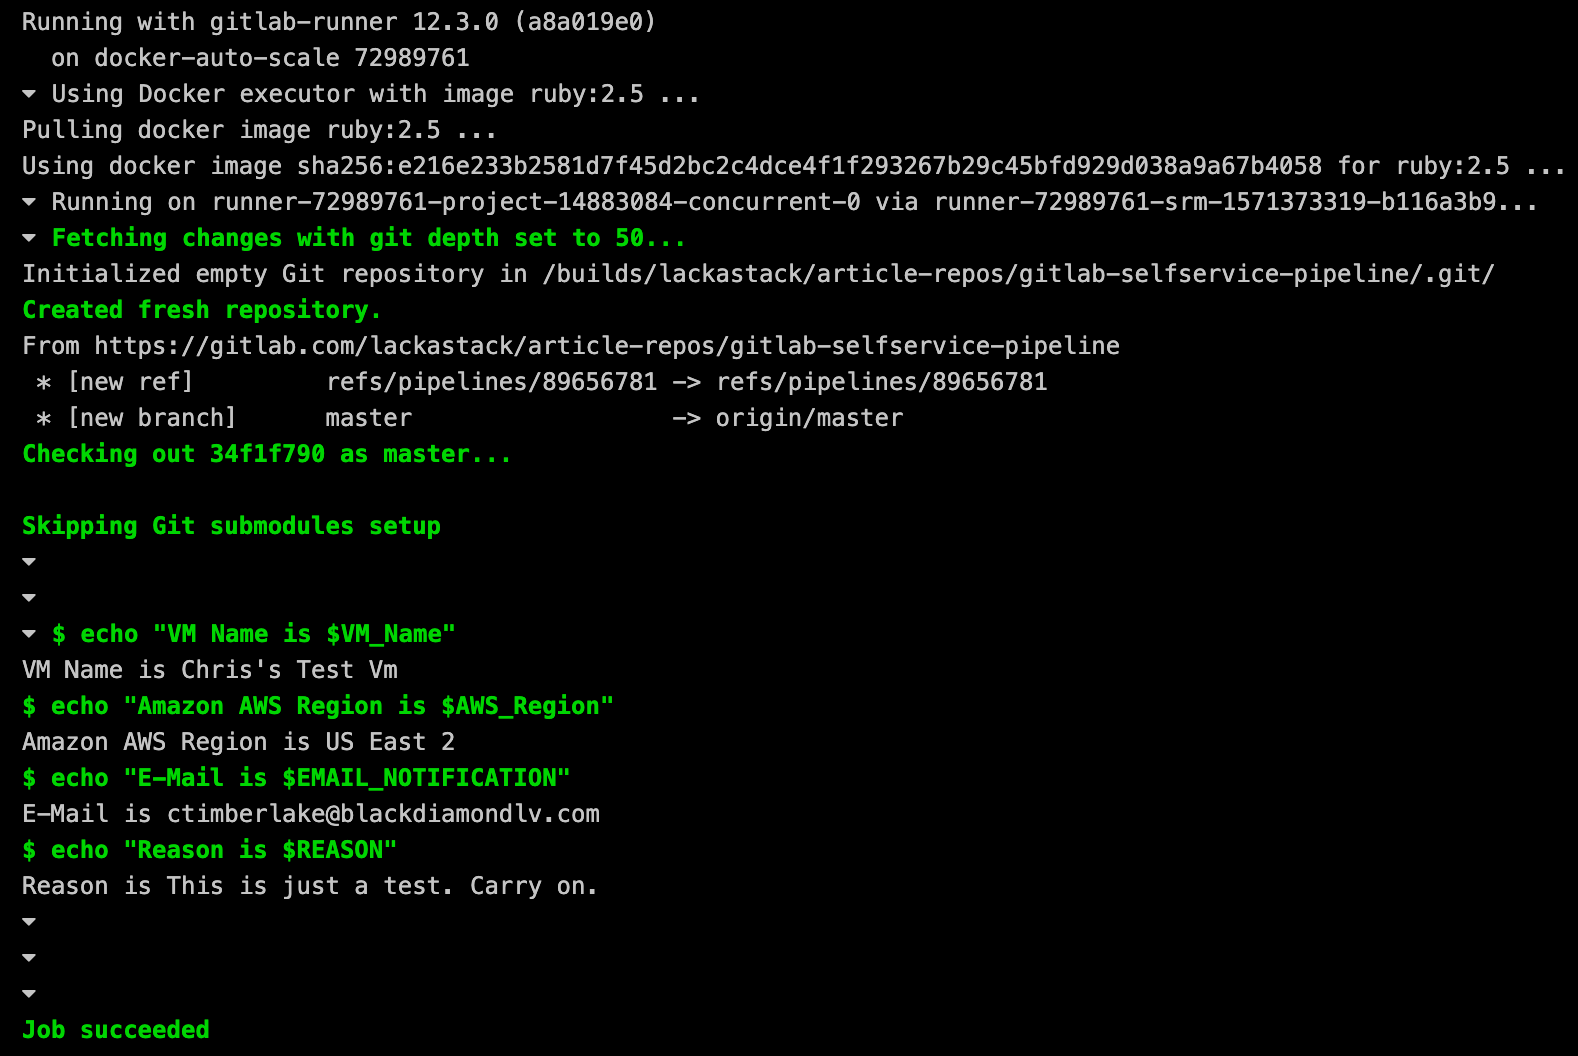
- echo "VM Name is $VM_Name"
- echo "Amazon AWS Region is $AWS_Region"
- echo "E-Mail is $EMAIL_NOTIFICATION"
- echo "Reason is $REASON"The first line above is defining the job name `check-variables`. Then we indent and define the stage, it needs to match one of our previously defined stages. `stage: check-vars`.The script block defines what we need to do in this job. Imagine each line in a bash file is listed out with a - preceding it to designate it as an array item. For the infrastructure block, we're just going to echo some garbage for now.
build-infrastructure:
    stage: do-infrastructure
    script:
        - echo "Do Infrastructure in Article #2 W00T!"
Go ahead and commit those changes. With that, our pipeline should be good to go.
Connecting The Form to the CI/CD.
Now, the big question arises, How the heck do we connect these two things? It's a secret, it'll cost you $3.50... No, it's simple. We'll simply use a pipeline trigger.
In the left navigation of the Pipeline Repo, go to Settings -> CI/CD. Then click expand on Pipeline Triggers
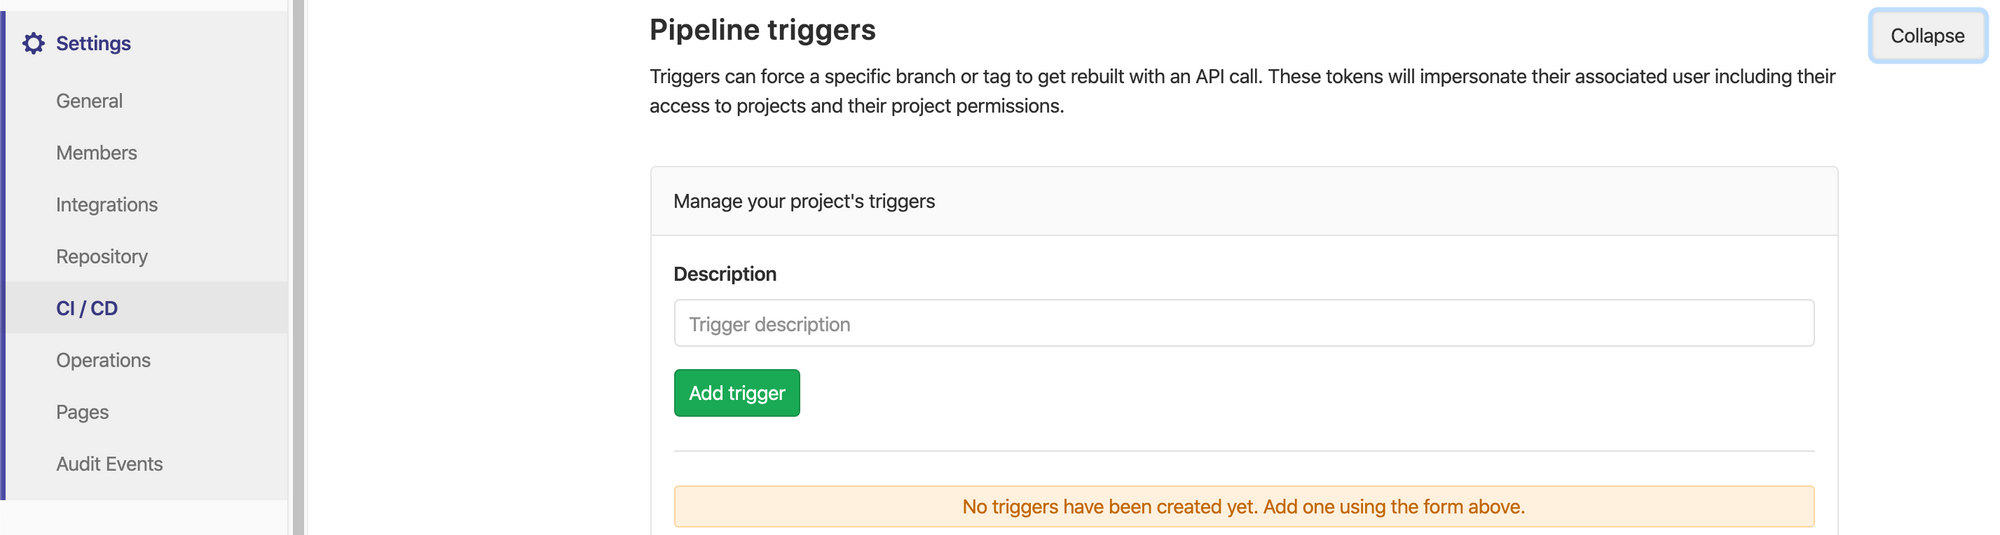
From here you'll want to create a trigger. In the Trigger Description field, enter something in. In our case, we're going to call it "Self-Service Trigger". Once you create it, you'll be granted a pipeline trigger token. Save this token somewhere. Then below that you'll see a number of use cases for the pipeline trigger. Find the section "Use Webhook", copy the URL thats in that field. Entirely.

Pipeline Trigger Ownership & Security
This token when used in this form manner is publically accessible. Meaning people can trigger pipelines with this token and insert false data. It's important you both restrict access to the form in a production environment, and that your pipeline does not contain secrets. All variables+secrets should be injected by the user via the form. This way, without inserting the API Key, the pipeline job fails.
The person who makes a pipeline trigger is defined as that trigger's owner. This means, any time that trigger as ran. The pipeline will run with their permissions. Consider making a lower-access account for this.
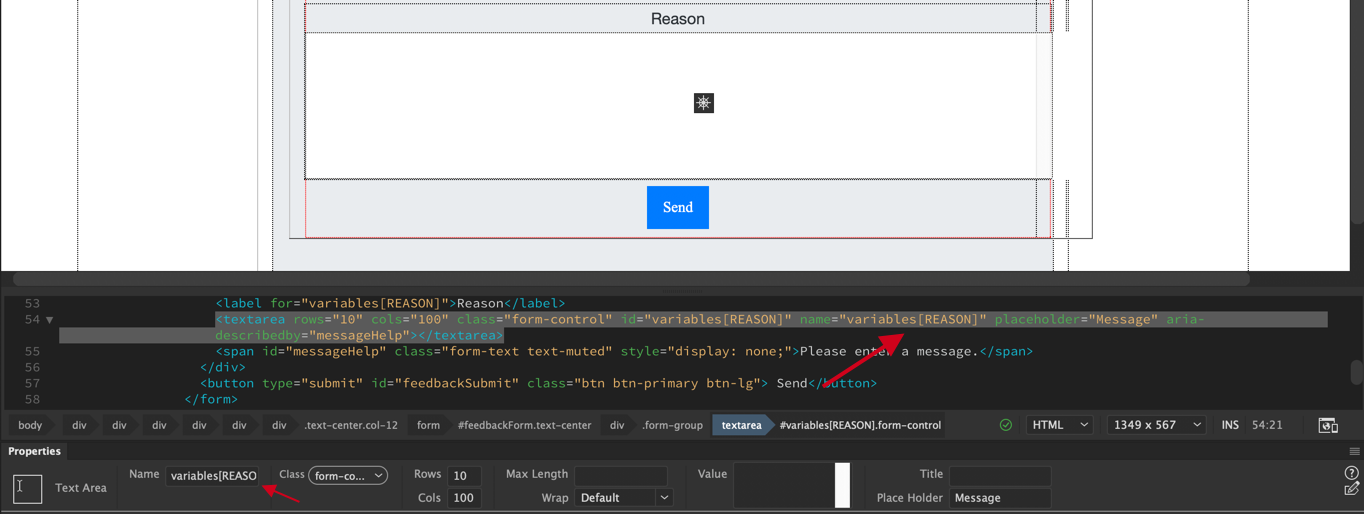
Now that we have that information, We need to update our forms. Go ahead and find your HTML file (should be named index.html). Open it with notepad or your favorite error.
The first thing we need to setup the form to POST to the Trigger pipeline. You'll need to find your <form block and add action="webhookurl" with the REF_NAME being master, and TOKEN being replaced with your token. Then you need to add method="POST" to the same line, this marks it as a POST request. My example is below.
<form id="feedbackForm" class="text-center" action="https://gitlab.com/api/v4/projects/14883084/ref/master/trigger/pipeline?token=943227eec64c3ac6ab4e8436a45bfa" method="POST">Now, when we submit the form it will trigger the pipeline! AWESOME! Except... We also want to pass variables. Remember above how we referenced the $VM_Name, $AWS_Region, $EMAIL_NOTIFICATION, $REASON above? Now, we need to assign those in our form. To link these values from the HTML Form to the pipeline, we need to set the name of the form field. This name must be named like this: variables[VM_Name] or variables[AWS_Region].
Go ahead and make those changes, add name="variables[VM_Name]" to your input field, or select the field in the editor and set the name. An example of this can be seen below.
Now save this file, and commit it to the self-service repository. The pipeline should kick off and your form should then become visible. You can find the URL for your self-service at Settings -> Pages. It may take up to five minutes for this to happen.
In Closing
At this point, if you've followed everything. You should be able to submit the form and see the pipeline kick off. Let us know if you have any concerns!
You can see the example of the form i've created here.
You can see your pipeline being ran and it's result here.